In the landscape of modern web development, the MERN stack (MongoDB, Express.js, React, Node.js) reigns supreme for building dynamic, full-stack applications. However, moving code from a local development environment to a live production server remains a significant hurdle for many developers. Mastering deployment is what separates junior developers from experienced full-stack engineers.
- Why AWS EC2 for Your MERN Stack?
- Prerequisites and Initial Setup
- Step 1: Launching Your AWS EC2 Instance
- Naming and Tags
- Choosing an Amazon Machine Image (AMI)
- Selecting an Instance Type
- Key Pair (Login)
- Network Settings and Security Groups
- Storage configuration
- Step 2: Connecting to Your Cloud Server via SSH
- Step 3: Setting Up the Node.js Environment
- Step 4: Database Configuration: Installing MongoDB
- Step 5: Preparing Your MERN Application for Deployment
- Step 6: Running the Backend with PM2
- Step 7: Configuring Nginx as a Reverse Proxy
- Step 8: Securing Your Application with SSL (Let’s Encrypt)
- Final Checks and Ongoing Maintenance
- Conclusion
Today, we are diving deep into the industry standard for robust, scalable hosting: Amazon Web Services (AWS). specifically utilizing the Elastic Compute Cloud (EC2).
This comprehensive guide will walk you through every single step required to take your MERN application and deploy it onto a production-ready Ubuntu server on AWS EC2. We will cover infrastructure setup, security configurations, database installation, reverse proxy management with Nginx, and securing traffic with SSL certificates. By the end of this tutorial, you will possess the knowledge to confidently manage your own cloud infrastructure.
Why AWS EC2 for Your MERN Stack?
Before we touch the command line, it is vital to understand why we choose this route. AWS EC2 offers unparalleled control over your environment. Unlike Platform-as-a-Service (PaaS) offerings like Heroku or Vercel, which abstract away the underlying server, EC2 gives you a blank canvas.
This level of control means you are responsible for updates, security patches, and scaling strategies. While this introduces complexity, it also provides significant cost benefits at scale and ensures you are not locked into a specific vendor’s deployment pipeline. For serious applications requiring custom configurations or specific architectural needs, EC2 is the gold standard.
Prerequisites and Initial Setup
To successfully follow this guide, ensure you have the following items ready. This tutorial assumes you have a functional MERN application working locally.
- An active AWS Account: You will need a valid account with billing enabled. We will aim to stay within the AWS Free Tier limits, but vigilance regarding usage is always recommended.
- Terminal Access: You need a command-line interface (Terminal on macOS/Linux, or Git Bash/PowerShell on Windows) with SSH capabilities.
- Your MERN Codebase: Your application should be pushed to a remote Git repository (like GitHub or GitLab). Ensure your backend and frontend are structured in a way that allows them to be run independently, or that your frontend is pre-built into static assets.
- A Purchased Domain Name: While you can access your site via the raw AWS IP address, setting up SSL for secure HTTPS traffic requires a valid domain name pointing to your server.
Step 1: Launching Your AWS EC2 Instance
The journey begins in the AWS Management Console. Our first objective is to provision the virtual server that will house our application.
Navigate to the EC2 Dashboard by searching for “EC2” in the AWS console search bar. Once there, click the prominent orange “Launch Instance” button.
Naming and Tags
Give your instance a recognizable name, such as “MERN-Production-Server”. Using clear naming conventions is critical as your infrastructure grows.
Choosing an Amazon Machine Image (AMI)
The AMI is the operating system template for your instance. For maximum compatibility with modern web technologies and robust community support, we will select Ubuntu.
Specifically, choose Ubuntu Server 22.04 LTS (HVM), SSD Volume Type. The “LTS” stands for Long Term Support, ensuring stability and security updates for years to come. This is the industry preference for production web servers.
Selecting an Instance Type
The instance type determines the hardware resources (CPU and RAM) allocated to your server. For demonstration purposes and initial deployments, select t2.micro.
The t2.micro instance is eligible for the AWS Free Tier (providing 750 hours per month for the first 12 months). It offers 1 vCPU and 1 GiB of Memory, which is sufficient for a low-to-moderate traffic MERN application.
Key Pair (Login)
This is a critical security step. EC2 instances use SSH keys for authentication rather than passwords.
Click “Create new key pair”. Give it a name related to your project. Select “RSA” as the type and “.pem” as the file format (if you are on Mac/Linux) or “.ppk” (if you are using PuTTY on Windows, though modern Windows 10/11 supports OpenSSH and .pem).
Download the key pair file immediately. Store it securely. You will not be able to download this file again, and without it, you cannot access your server.
Network Settings and Security Groups
This section acts as a virtual firewall for your instance, controlling inbound and outbound traffic. By default, AWS creates a new security group. We need to configure it to allow necessary traffic.
Ensure “Allow SSH traffic from” is checked. For maximum security, restrict this to “My IP”. However, if your IP changes frequently, “Anywhere” (0.0.0.0/0) is acceptable for initial setup, but remember to tighten this later.
We must also add rules for web traffic. Click “Edit” in the network settings block, then “Add security group rule”. Add the following two rules:
- Type: HTTP | Port range: 80 | Source type: Anywhere (0.0.0.0/0)
- Type: HTTPS | Port range: 443 | Source type: Anywhere (0.0.0.0/0)
These rules allow the outside world to view your web application.
Storage configuration
The default 8 GiB gp2 or gp3 root volume is usually sufficient to start. You can increase this if your application stores significant data locally, but 8GB is fine for the OS and application code.
Finally, review your settings in the summary panel on the right and click “Launch Instance”.
Step 2: Connecting to Your Cloud Server via SSH
Once the instance state changes from “Pending” to “Running” in the EC2 dashboard, select the instance to view its details. Locate the Public IPv4 address or the Public IPv4 DNS. Copy this address.
Open your local terminal. You need to navigate to the directory where you saved your PEM key pair file. Before connecting, you must modify the permissions of the key file so that only you can read it, otherwise SSH will reject it as insecure.
Run the following command (replacing your-key-pair.pem with your actual filename):
Bash
chmod 400 your-key-pair.pem
Now, connect to your instance using the ubuntu user and your IP address:
Bash
ssh -i your-key-pair.pem ubuntu@<YOUR_EC2_PUBLIC_IP>
Type “yes” when asked to confirm the authenticity of the host. You should now see a welcome message indicating you have successfully logged into your Ubuntu server.
Updating the Server
The very first action upon logging into a fresh Linux server is always to update the local package index and upgrade existing packages. This ensures security patches are applied.
Bash
sudo apt update && sudo apt upgrade -y
This process might take a few minutes depending on how many updates are available for the AMI.
Step 3: Setting Up the Node.js Environment
Since we are deploying a MERN stack app, Node.js is the cornerstone of our backend environment.
While you can install Node.js via the default Ubuntu repositories, these versions are often outdated. The professional approach is to use NVM (Node Version Manager). NVM allows you to easily install and switch between multiple Node versions.
First, download the NVM installation script using cURL (check the official NVM repository for the latest version number, currently around v0.39.5):
Bash
curl -o- https://raw.githubusercontent.com/nvm-sh/nvm/v0.39.5/install.sh | bash
Once the script runs, it will add configuration to your ~/.bashrc file. To load nvm into your current shell session without restarting the terminal, run:
Bash
source ~/.bashrc
Verify NVM is installed:
Bash
nvm --version
Now we install Node.js. For production applications, you should almost always use the current Long Term Support (LTS) version, as it guarantees stability.
Bash
nvm install --lts
Once installed, verify the Node and NPM (Node Package Manager) versions:
Bash
node -v
npm -v
You should see versions corresponding to the current LTS release (e.g., v18.x.x or v20.x.x).
Step 4: Database Configuration: Installing MongoDB
If your application uses MongoDB Atlas (the cloud database service), you can skip the local installation step and proceed to setting up environment variables. However, hosting the database on the same EC2 instance is a common configuration to reduce latency and costs for smaller deployments.
We will install MongoDB Community Edition on our Ubuntu server. Do not use the default Ubuntu repository for MongoDB as it is rarely current. We must add the official MongoDB repository sources.
Note: These steps apply to Ubuntu 22.04. Always verify the latest installation instructions on MongoDB’s official documentation site.
First, import the public GPG key used by the package management system:
Bash
curl -fsSL https://pgp.mongodb.com/server-7.0.asc | \
   sudo gpg -o /usr/share/keyrings/mongodb-server-7.0.gpg \
   --dearmor
Next, create a list file for MongoDB:
Bash
echo "deb [ arch=amd64,arm64 signed-by=/usr/share/keyrings/mongodb-server-7.0.gpg ] https://repo.mongodb.org/apt/ubuntu jammy/mongodb-org/7.0 multiverse" | sudo tee /etc/apt/sources.list.d/mongodb-org-7.0.list
Reload the local package database:
Bash
sudo apt update
Install the MongoDB packages:
Bash
sudo apt install -y mongodb-org
Once installation completes, start the MongoDB service and enable it to start automatically whenever the server reboots:
Bash
sudo systemctl start mongod
sudo systemctl enable mongod
Verify the service is running:
Bash
sudo systemctl status mongod
You should see an “active (running)” status.
Basic MongoDB Security
By default, MongoDB allows connections without authentication. This is dangerous on a server. We need to create an administrator user and enable authentication.
Access the MongoDB shell:
Bash
mongosh
Switch to the admin database and create a root user. Replace ‘securepassword’ with a strong, unique password.
JavaScript
use admin
db.createUser(
  {
    user: "myAdmin",
    pwd: "securepassword",
    roles: [ { role: "userAdminAnywhere", db: "admin" }, "readWriteAnywhere" ]
  }
)
Exit the shell by typing exit.
Now we must tell MongoDB to enable authorization. Open the mongod configuration file using the nano text editor:
Bash
sudo nano /etc/mongod.conf
Scroll down to the #security: section. Remove the hash (#) to uncomment it and modify it to look exactly like this (ensure indentation is correct using spaces, not tabs):
YAML
security:
  authorization: enabled
Save the file (Ctrl+O, Enter) and exit (Ctrl+X). Restart the service to apply changes:
Bash
sudo systemctl restart mongod
Your local MongoDB instance is now secured with basic authentication. Your MERN app’s connection string will need to be updated to reflect this user authentication (e.g., mongodb://myAdmin:securepassword@localhost:27017/yourDatabaseName).
Step 5: Preparing Your MERN Application for Deployment
We need to get your code onto the server. The standard method is using Git.
Git is usually pre-installed on Ubuntu, but verify with git --version. If not, install it via sudo apt install git.
Navigate to a suitable directory (usually your home directory is fine) and clone your repository.
Bash
cd ~
git clone https://github.com/yourusername/your-repo-name.git
Enter the newly created directory:
Bash
cd your-repo-name
Installing Dependencies
You need to install the dependencies for both your backend Node.js server and your frontend React application.
Assuming your root directory contains the backend package.json and a client folder contains the React frontend:
Bash
# Install backend dependencies
npm install

# Install frontend dependencies
cd client
npm install
cd ..
Environment Variables
Your application likely relies on environment variables for sensitive data like database connection strings, JWT secrets, or API keys. Never commit these to GitHub.
We need to create a .env file on the production server.
Bash
nano .env
Paste in your production variables. For example:
NODE_ENV=production
PORT=5000
MONGO_URI=mongodb://myAdmin:securepassword@localhost:27017/myProductionDB
JWT_SECRET=aVeryLongComplexProductionSecretString
Save and exit the file.
Building the Frontend
React applications cannot run directly in the browser from source code in production. They must be “built” or compiled into static HTML, CSS, and JavaScript files.
Navigate to your frontend client directory and run the build script:
Bash
cd client
npm run build
This will create a build (or sometimes dist) directory within your client folder. These are the files that Nginx will eventually serve to the public.
Step 6: Running the Backend with PM2
If you start your Node.js server using node index.js or npm start, it will run in your terminal session. As soon as you close the SSH connection or if the application crashes, your website goes down. This is unacceptable for production.
We need a process manager. The industry standard for Node.js is PM2. PM2 is a production process manager that keeps your application alive forever, reloads it without downtime, and facilitates common system administration tasks.
Install PM2 globally on your server:
Bash
npm install pm2 -g
Navigate back to the root of your project (where your backend server file lives, e.g., server.js or index.js). Start your application with PM2. We will name the process “mern-backend” for easy identification.
Bash
pm2 start server.js --name "mern-backend"
Your backend should now be running in the background. You can view its status with:
Bash
pm2 status
Ensuring Startup Persistence
If your EC2 instance reboots due to maintenance or an outage, you want PM2 to automatically restart your application. PM2 can generate a startup script for your specific OS.
Run this command and copy the output it generates:
Bash
pm2 startup
Paste the generated command back into your terminal and execute it. It will look something like sudo env PATH=$PATH:/home/ubuntu/.nvm/... pm2 startup systemd -u ubuntu --hp /home/ubuntu.
Finally, save the current list of running processes so PM2 remembers what to start next time:
Bash
pm2 save
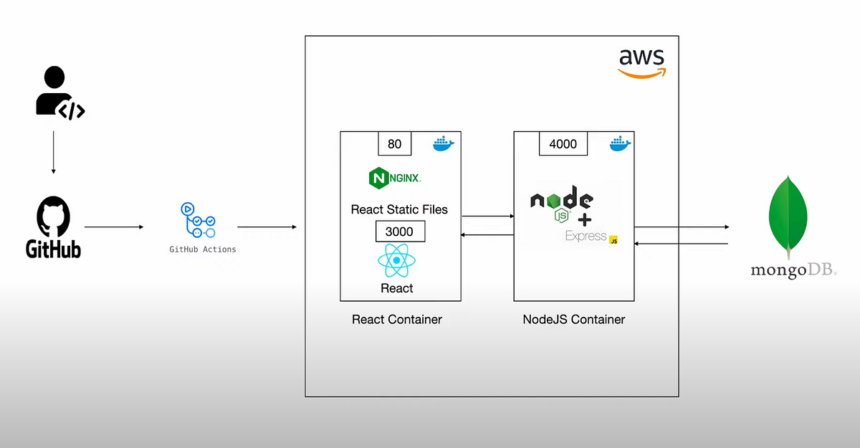
Step 7: Configuring Nginx as a Reverse Proxy
At this point, your backend is running on, say, port 5000, and your frontend build files are sitting in a folder. We need a web server to tie this together and expose it to the standard HTTP port (80).
We will use Nginx, a high-performance HTTP server and reverse proxy. Nginx will handle incoming requests from the internet. It will serve the static frontend files directly and forward any API requests to your Node.js backend running on localhost:5000.
Install Nginx:
Bash
sudo apt install nginx -y
Nginx should start automatically. Verify by visiting your EC2 instance’s public IP address in your web browser. You should see the “Welcome to nginx!” default page.
Configuring the Server Block
We need to create a configuration file detailing how Nginx should handle traffic for your application. Nginx configuration files are typically stored in /etc/nginx/sites-available/.
Create a new configuration file named after your project or domain:
Bash
sudo nano /etc/nginx/sites-available/mern-app
Paste the following configuration into the editor. You must update the paths and domain names to match your specific setup.
Important Considerations for the config below:
server_name: Replaceyourdomain.comandwww.yourdomain.comwith your actual purchased domain name. If you do not have one yet, you can use your EC2 Public IP address here temporarily.root: This path must point exactly to thebuildfolder you generated earlier in the React client directory. Double-check this path usingpwdin your terminal if unsure.proxy_pass: Ensure the port (e.g., 5000) matches the PORT you defined in your backend.envfile.
Nginx
server {
    listen 80;
    server_name yourdomain.com www.yourdomain.com;

    root /home/ubuntu/your-repo-name/client/build;
    index index.html index.htm;

    location / {
        try_files $uri $uri/ /index.html;
    }

    location /api {
        proxy_pass http://localhost:5000;
        proxy_http_version 1.1;
        proxy_set_header Upgrade $http_upgrade;
        proxy_set_header Connection 'upgrade';
        proxy_set_header Host $host;
        proxy_cache_bypass $http_upgrade;
    }
}
Understanding the Configuration:
listen 80;: Nginx listens for incoming connections on port 80 (HTTP).root ...: Tells Nginx where your static frontend files are located.location /: This block handles general requests. Thetry_files $uri $uri/ /index.html;line is crucial for React (or any Single Page Application). It means “if the user requests a specific route (like /dashboard), try to find a file matching that name. If you can’t find it, serve theindex.htmlfile anyway.” This allows React Router to handle the routing on the client-side instead of Nginx returning a 404 error.location /api: This block intercepts any requests that start with/api. Instead of trying to find a file, it acts as a reverse proxy, forwarding the request to your Node.js backend running onhttp://localhost:5000. The proxy headers ensure your backend receives necessary information about the original request.
Save and exit the file.
Next, enable this configuration by creating a symbolic link to the sites-enabled directory:
Bash
sudo ln -s /etc/nginx/sites-available/mern-app /etc/nginx/sites-enabled/
It is good practice to remove the default Nginx configuration to avoid conflicts:
Bash
sudo rm /etc/nginx/sites-enabled/default
Test your Nginx configuration for syntax errors:
Bash
sudo nginx -t
If you see “syntax is okay” and “test is successful”, restart Nginx to apply the changes:
Bash
sudo systemctl restart nginx
At this stage, if you pointed your domain’s DNS A record to your EC2 IP address, you should be able to visit http://yourdomain.com and see your MERN application working.
Step 8: Securing Your Application with SSL (Let’s Encrypt)
Running an application over HTTP in today’s web environment is insecure and damaging to SEO. Browsers will flag your site as “Not Secure”. We must enable HTTPS.
Fortunately, Let’s Encrypt provides free, automated SSL certificates through a tool called Certbot.
Prerequisite: You absolutely must have a valid domain name (e.g., example.com) and its DNS “A Record” must be pointing to your EC2 instance’s public IP address. Do not proceed until this DNS propagation is complete.
Install Certbot and the Nginx plugin using snap (which comes pre-installed on Ubuntu 22.04):
Bash
sudo snap install core; sudo snap refresh core
sudo snap install --classic certbot
sudo ln -s /snap/bin/certbot /usr/bin/certbot
Now, run Certbot to obtain and install the certificate. Certbot will analyze your Nginx configuration and automatically configure SSL for the domains you specified in the server_name directive.
Bash
sudo certbot --nginx
Follow the on-screen prompts. Enter your email address for renewal notifications and agree to the terms of service.
When asked if you want to redirect HTTP traffic to HTTPS, choose Option 2: Redirect. This ensures that anyone typing http://yourdomain.com is automatically upgraded to the secure version.
Certbot will download the certificate and modify your Nginx configuration file automatically to handle the SSL termination.
Once finished, Certbot will confirm the successful installation. Your MERN application is now securely deployed with HTTPS.
Final Checks and Ongoing Maintenance
Firewall check
Ensure your internal firewall is allowing Nginx traffic. Ubuntu uses UFW (Uncomplicated Firewall).
Bash
sudo ufw app list
You should see “Nginx Full” in the list. Allow access:
Bash
sudo ufw allow 'Nginx Full'
sudo ufw enable
Monitoring Logs
Troubleshooting production issues requires knowing where the logs are.
- Backend Logs: Use PM2 to view logs for your Node.js application.Bash
pm2 logs mern-backendUse the--lines 200flag to see more history. - Nginx Logs: Nginx keeps access and error logs that are vital for debugging connection issues or 502 Bad Gateway errors.Bash
sudo tail -f /var/log/nginx/error.log sudo tail -f /var/log/nginx/access.log
Conclusion
Congratulations. You have successfully navigated the complexity of cloud infrastructure to deploy a full-stack MERN application onto AWS EC2. You have provisioned a server, secured it, configured a production-grade database, set up a process manager for backend resilience, utilized a reverse proxy for efficient routing, and secured the entire pipeline with SSL.
This setup forms a professional, scalable foundation for your web applications. As your traffic grows, you can leverage the power of AWS to upgrade your instance type, move your database to Amazon RDS, or implement load balancing, all building upon the skills you have applied today. Keep your server updated, monitor your logs, and continue building.
Source Links for documentation references:
- Node.js (NVM): https://github.com/nvm-sh/nvm
- MongoDB Installation on Ubuntu: https://www.mongodb.com/docs/manual/tutorial/install-mongodb-on-ubuntu/
- PM2 Process Manager: https://pm2.keymetrics.io/docs/usage/quick-start/
- Nginx Beginner’s Guide: https://nginx.org/en/docs/beginners_guide.html
- Certbot Instructions: https://certbot.eff.org/instructions